![]()
The optional top utility bar can have email id and phone number at left and social media links on right. The premium version of the theme “i-spirit” have the option to use custom text including shortcode.
Option location :
“Appearance” > “Customize” > “Basic Settings” for phone and email
“Appearance” > “Customize” > “Social Links” for social media links
Empty the dummy data (“#”) from the field to remove the social icons you do not require.
By default this bar is hidden on page with slider and can be turned ON from “Slider Settings”
The Premium version of the theme I-SPIRIT gives you the options to use text, shortcodes and few basic HTML tags in both the fields, additional dropdown menus can be added in these fields as well.

Left hand corner contain Contains 2 logos,
- “Reverse Transparent logo” for transparent logo on header
- Normal logo for all other pages
Logo option location :
“Appearance” > “Customize” > “Site Identity”
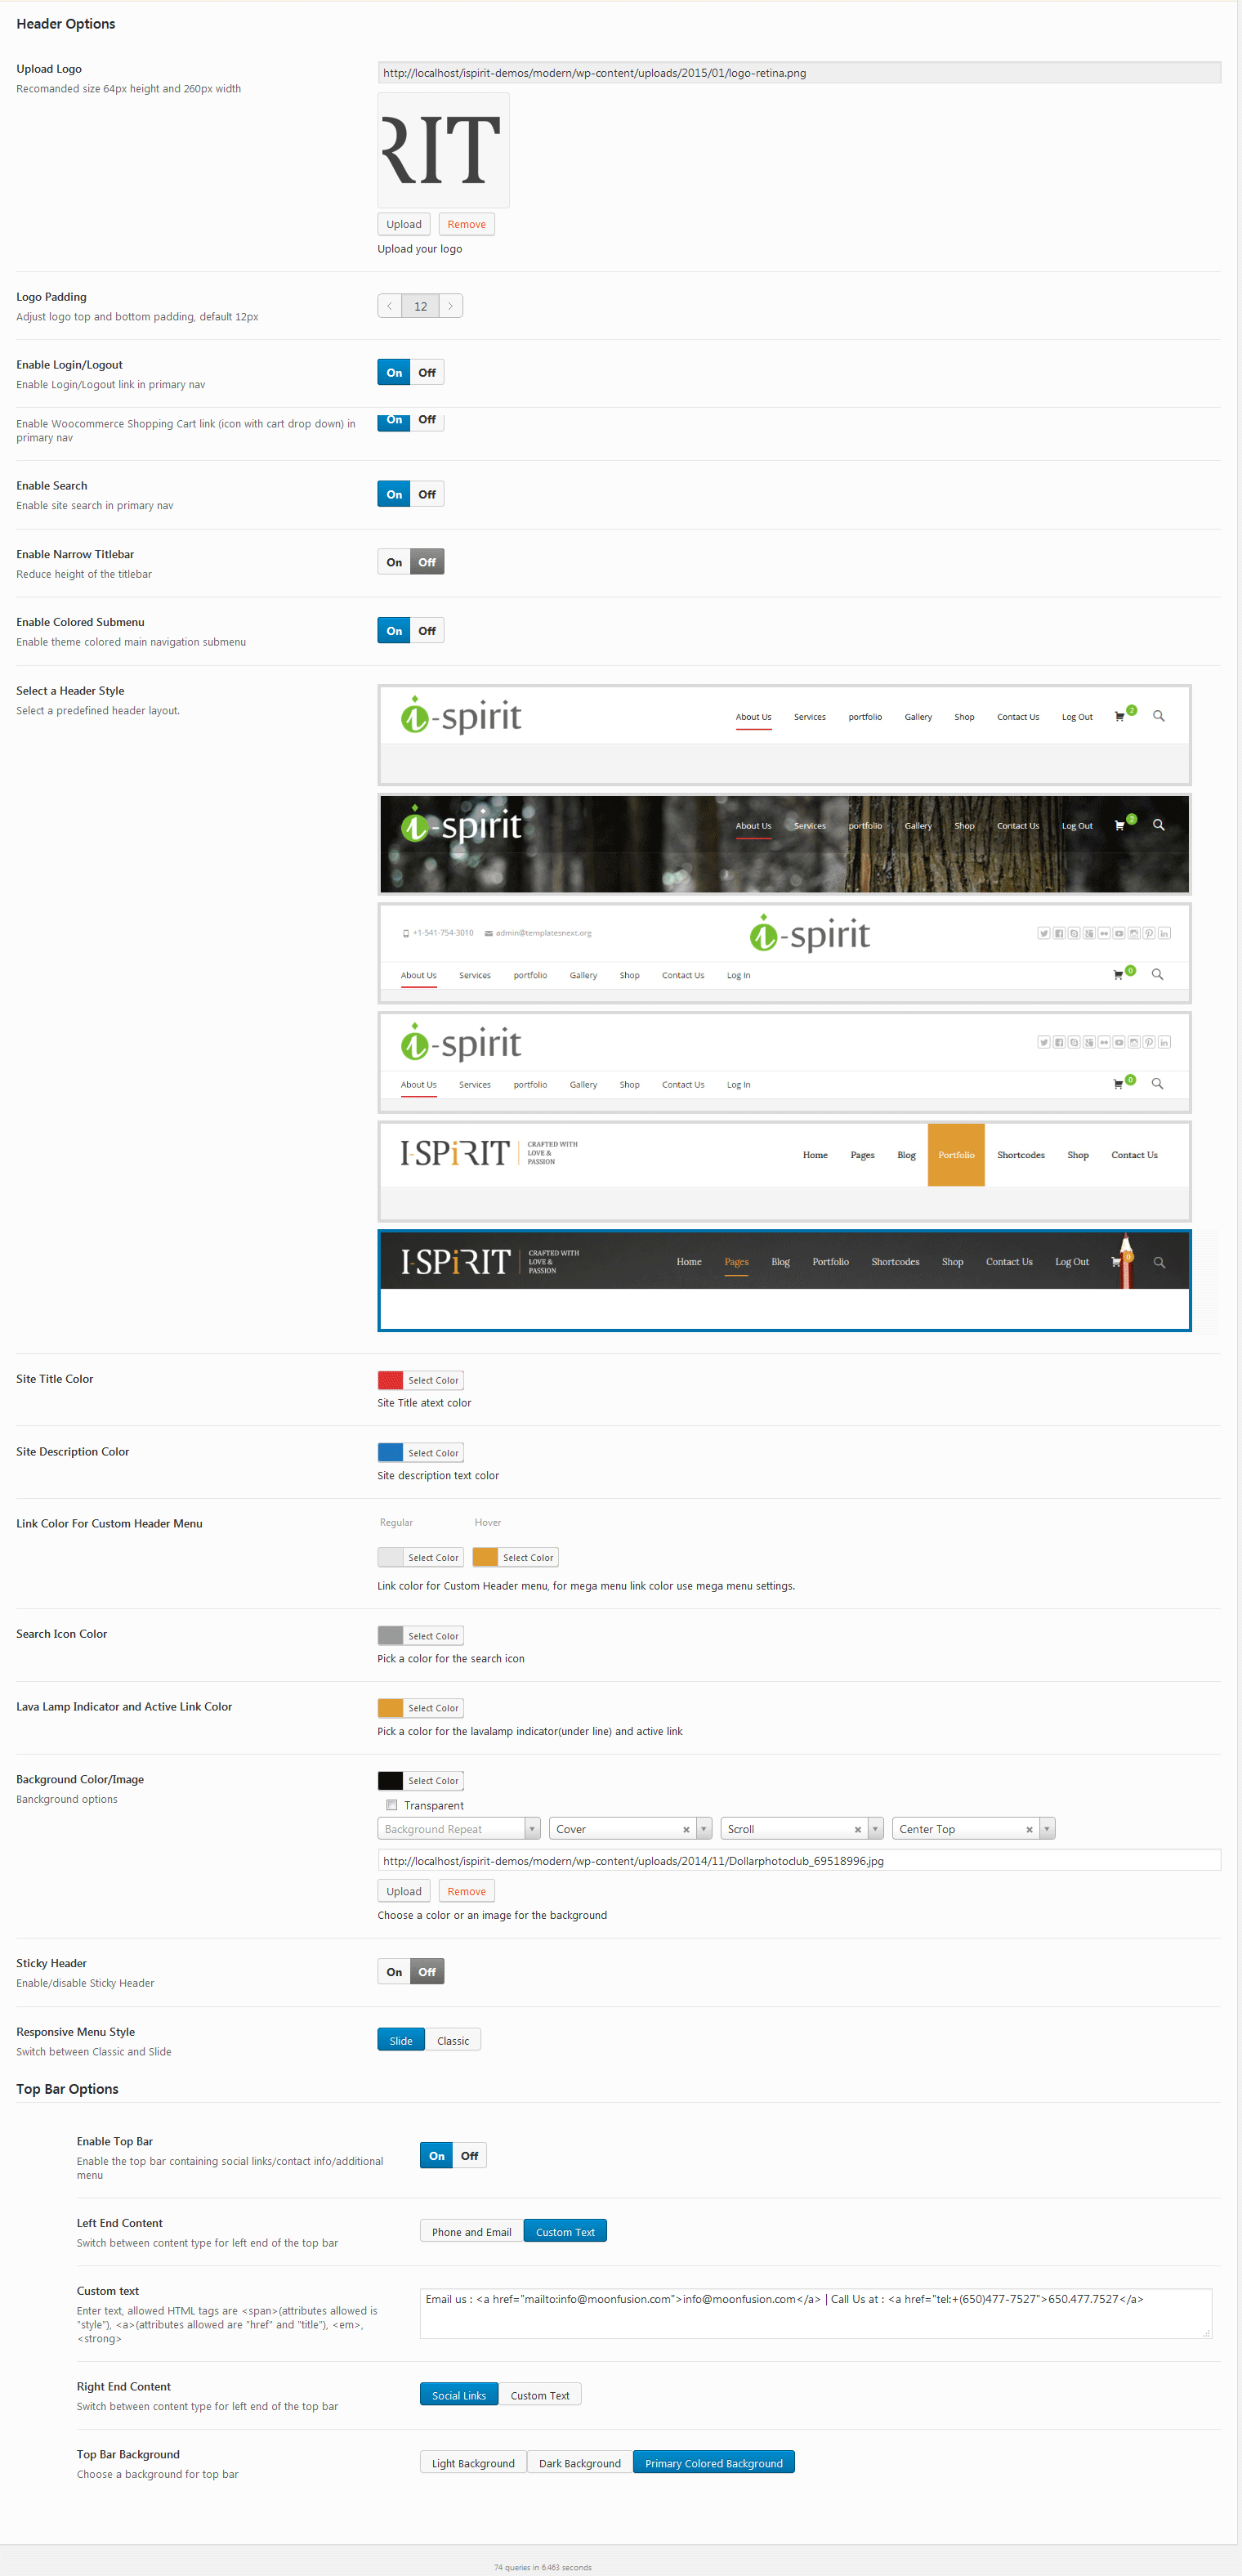
Header layout options :
I-DESIGN comes with 3 header layouts, with logo size adjustment control. Options are available at
“Appearance” > “Customize” > “Header Options”
Right hand corner contains the main navigation (check out the menu setup section bellow for details) along with site search. Site search can be turned off from “Appearance” > “Customize” > “Basic Settings” > “Show Search ”
The premium version of the theme (I-SPIRIT), has 6 presets and further customization options.
I-DESIGN is quite flexible when it comes to using slider. Any of the 4 options can be used
- A single image header background with a slogan option can be activated from menu “Appearance” > “Customize” > “Default Blog Page” > “Turn ON/OFF i-design Slider”
- “i-design Slider” default theme slider, All the settings and slides can be edited from menu “Appearance” > “Customize” > “Slider”
- “Other Slider Shortcode” for any third party slider plugin from menu “Appearance” > “Customize” > “Default Blog Page”.
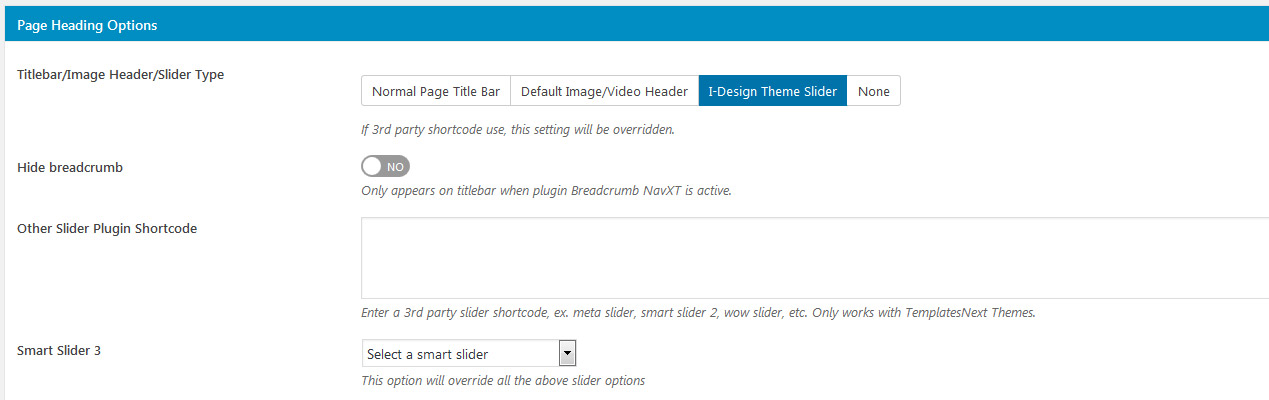
For each individual page or static front page you can choose to have a title bar (default) or use any of the last two options.
Page/Post options can be found just bellow the content editor
The premium version of the theme “I-SPIRIT” comes with #1 premium plugin “Slider Revolution“
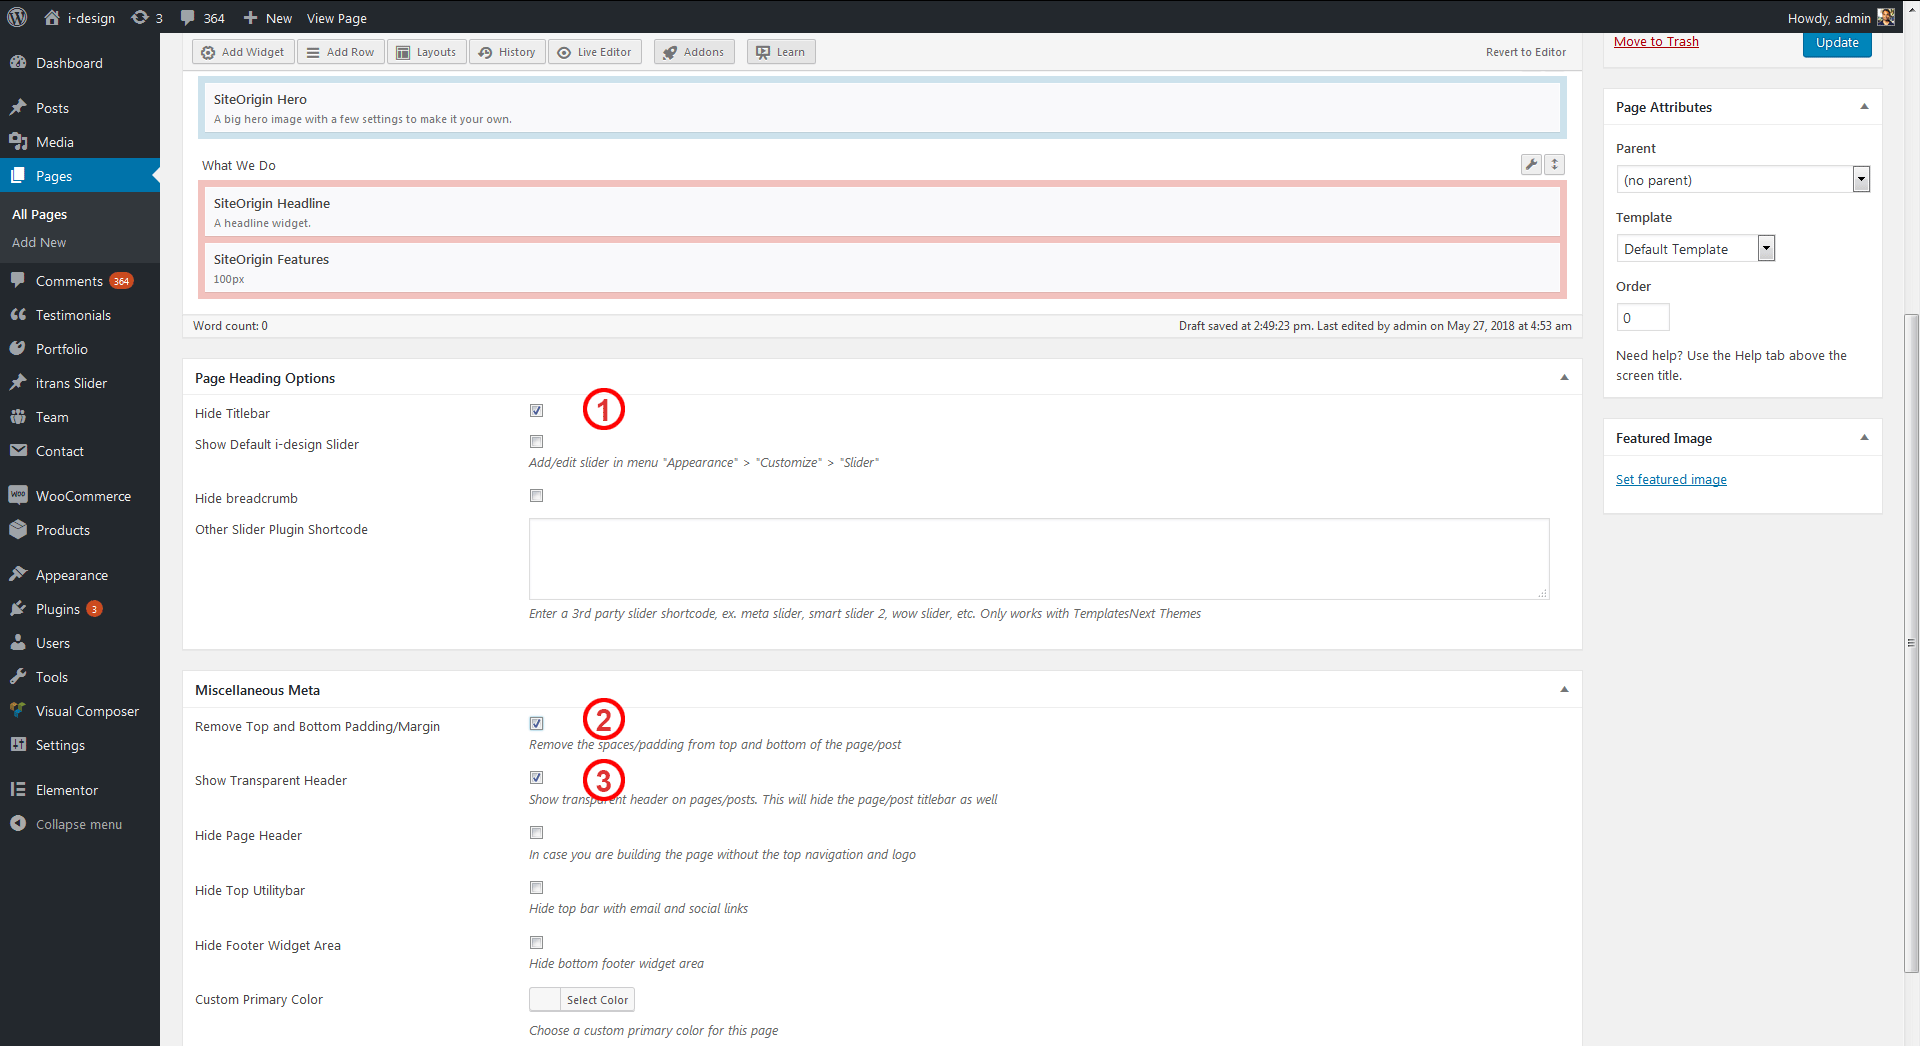
I-DESIGN comes with several page/post options. Currently available options are :
- Hide Title : Check this option to hide the titlebar.
- Show Default i-craft Slider : Check this option to show the theme slider on this page.
- Hide Breadcrumb : Hide the “Bread Crumb” (page location path).
- Other Slider Plugin Shortcode : If you wish to use other slider plugin instead of default theme slider.
- Remove Top and Bottom Padding/Margin : Remove the spacing (default top and bottom gap) in content area. useful while using page builder or elementor.
- Turn on the transparent header.
- Hide page header : While building a landing page or using a custom header plugin.
- Hide Top Utilitybar containing email, phone and social links.
- Hide Footer Widget Area : Removes to bottom widget area above the footer.
- Custom Page Color : A different default theme color for the page, useful while building landing pages.
- Additional Page Class : If you wish to use some custom CSS style for this page.

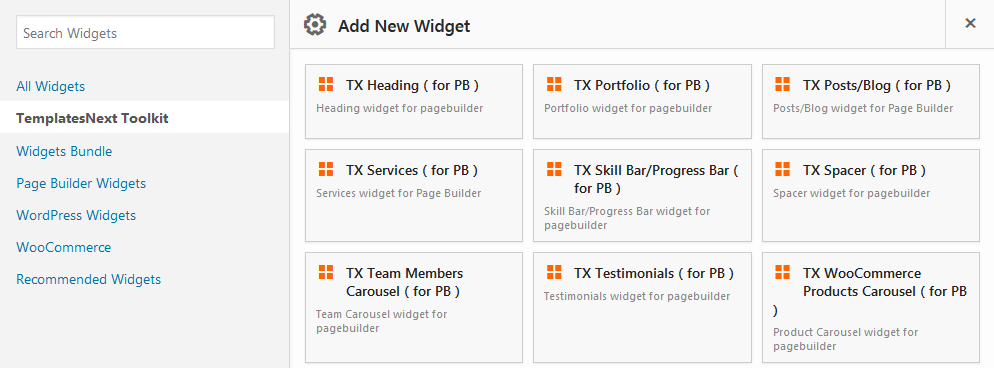
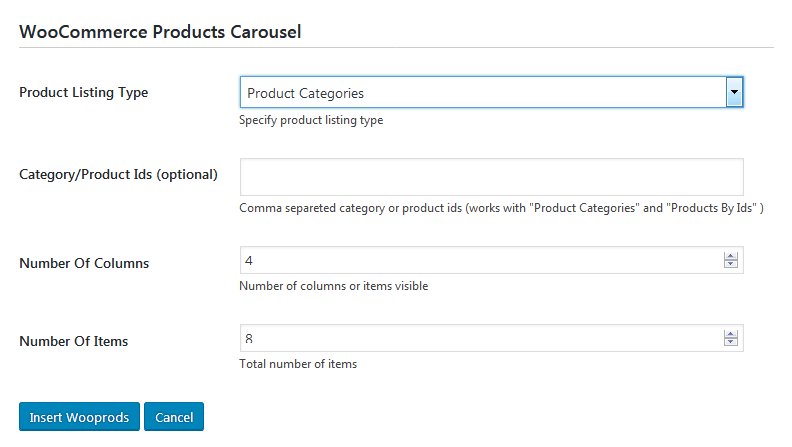
I-DESIGN not only supports “SiteOrigin Page Builder” it extends pagebuilder with TemplatesNext ToolKit widgets like portfolio, services, WooCommerce product carousels, etc
Follow the steps bellow to import a pre-built SiteOrigin Page Builder layout
- Check “Hide Titlebar” to hide default page titlebar.
- Check “Remove Top and Bottom Padding/Margin”
- Check “Show Transparent Header”.
- Activate “Page Builder” editor by clicking on “Page Builder” tab on right top corner.
- Click on “Layout” button
- Choose a pre-built layout and insert by choosing “Insert After”
The process of importing “Elementor” and “SiteOrigin Page Builder” layouts are same for the premium theme I-SPIRIT.
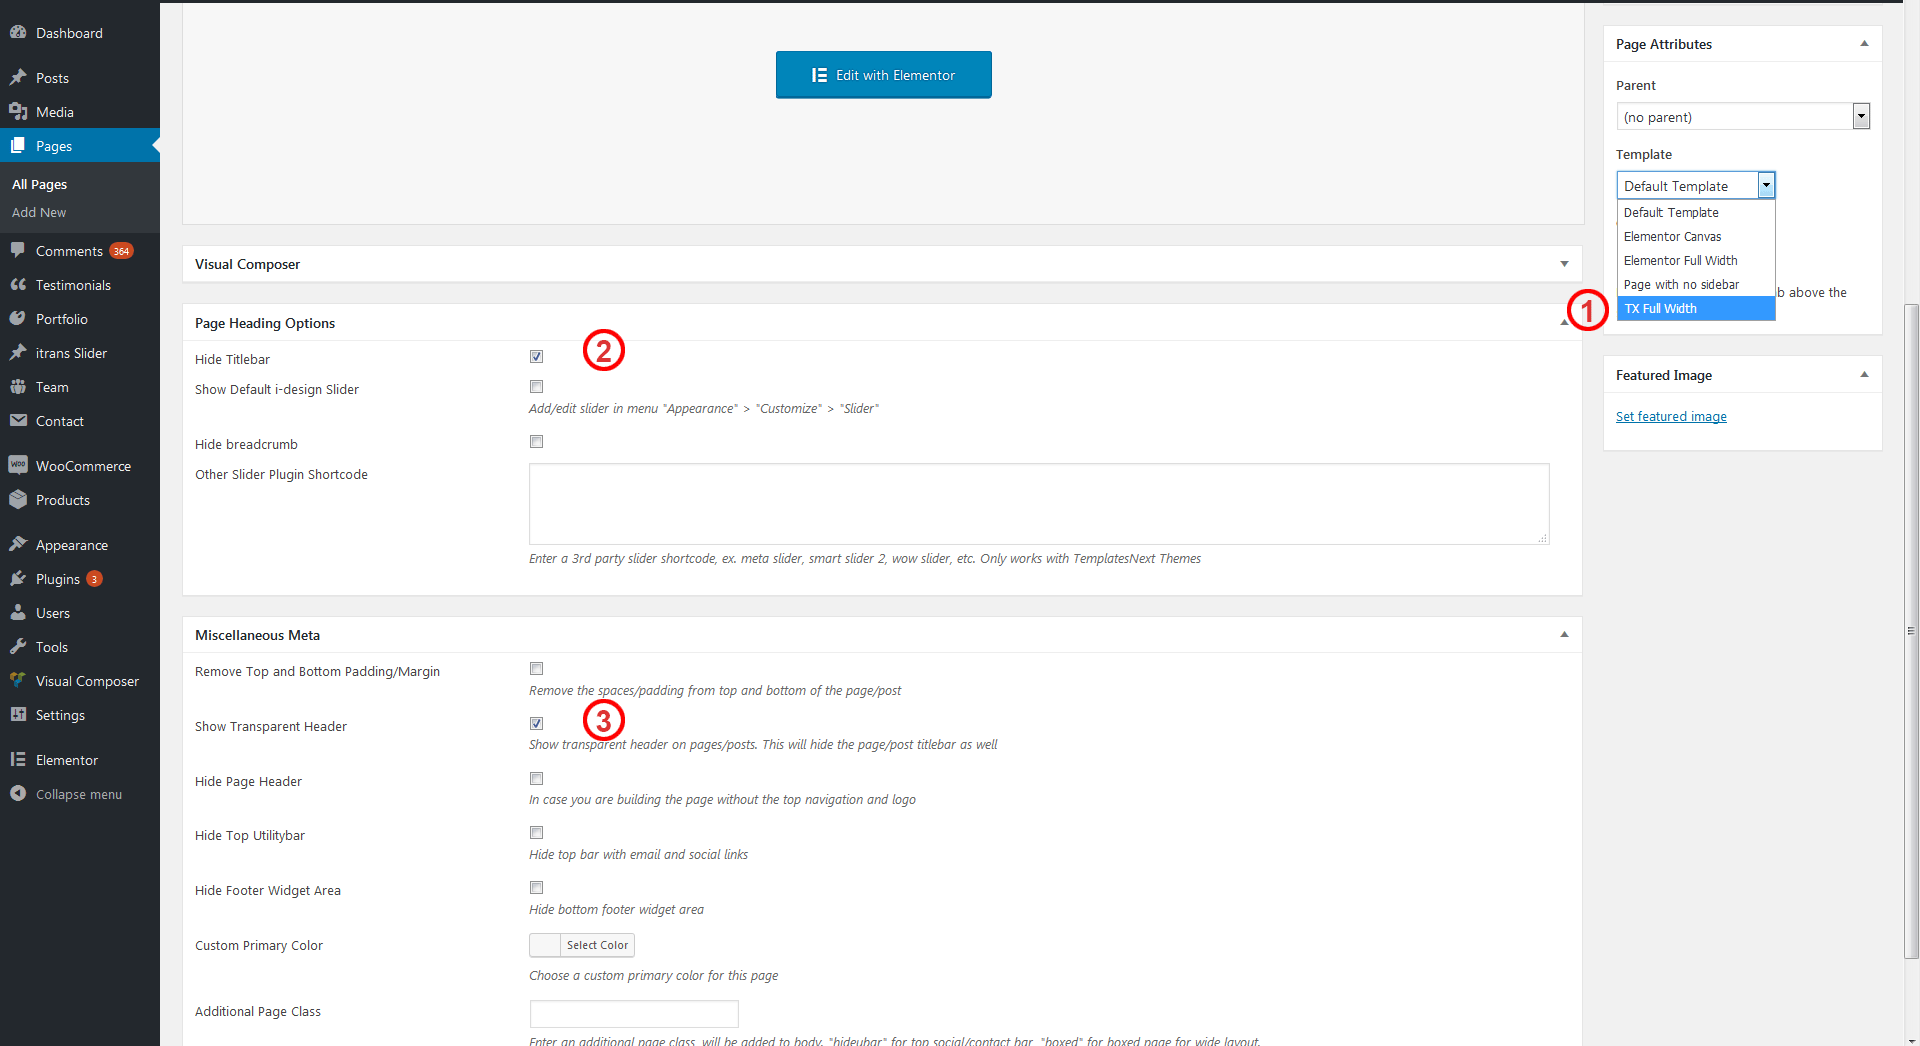
I-DESIGN supports Elementors as well
To insert a elementor pre-built layout follow the steps bellow,
- Select “TX Full Width” from “Page Attributes” > “Template”.
- Check “Hide Titlebar” to hide default page titlebar.
- Check “Show Transparent Header” to turn on transparent header for the page.
- Activate elementor editor.
- Click on “Add Template” and insert a pre-built layout.
The process of importing “Elementor” and “SiteOrigin Page Builder” layouts are same for the premium theme I-SPIRIT.
Available with premium version of the theme I-SPIRIT
Available with premium version I-SPIRIT
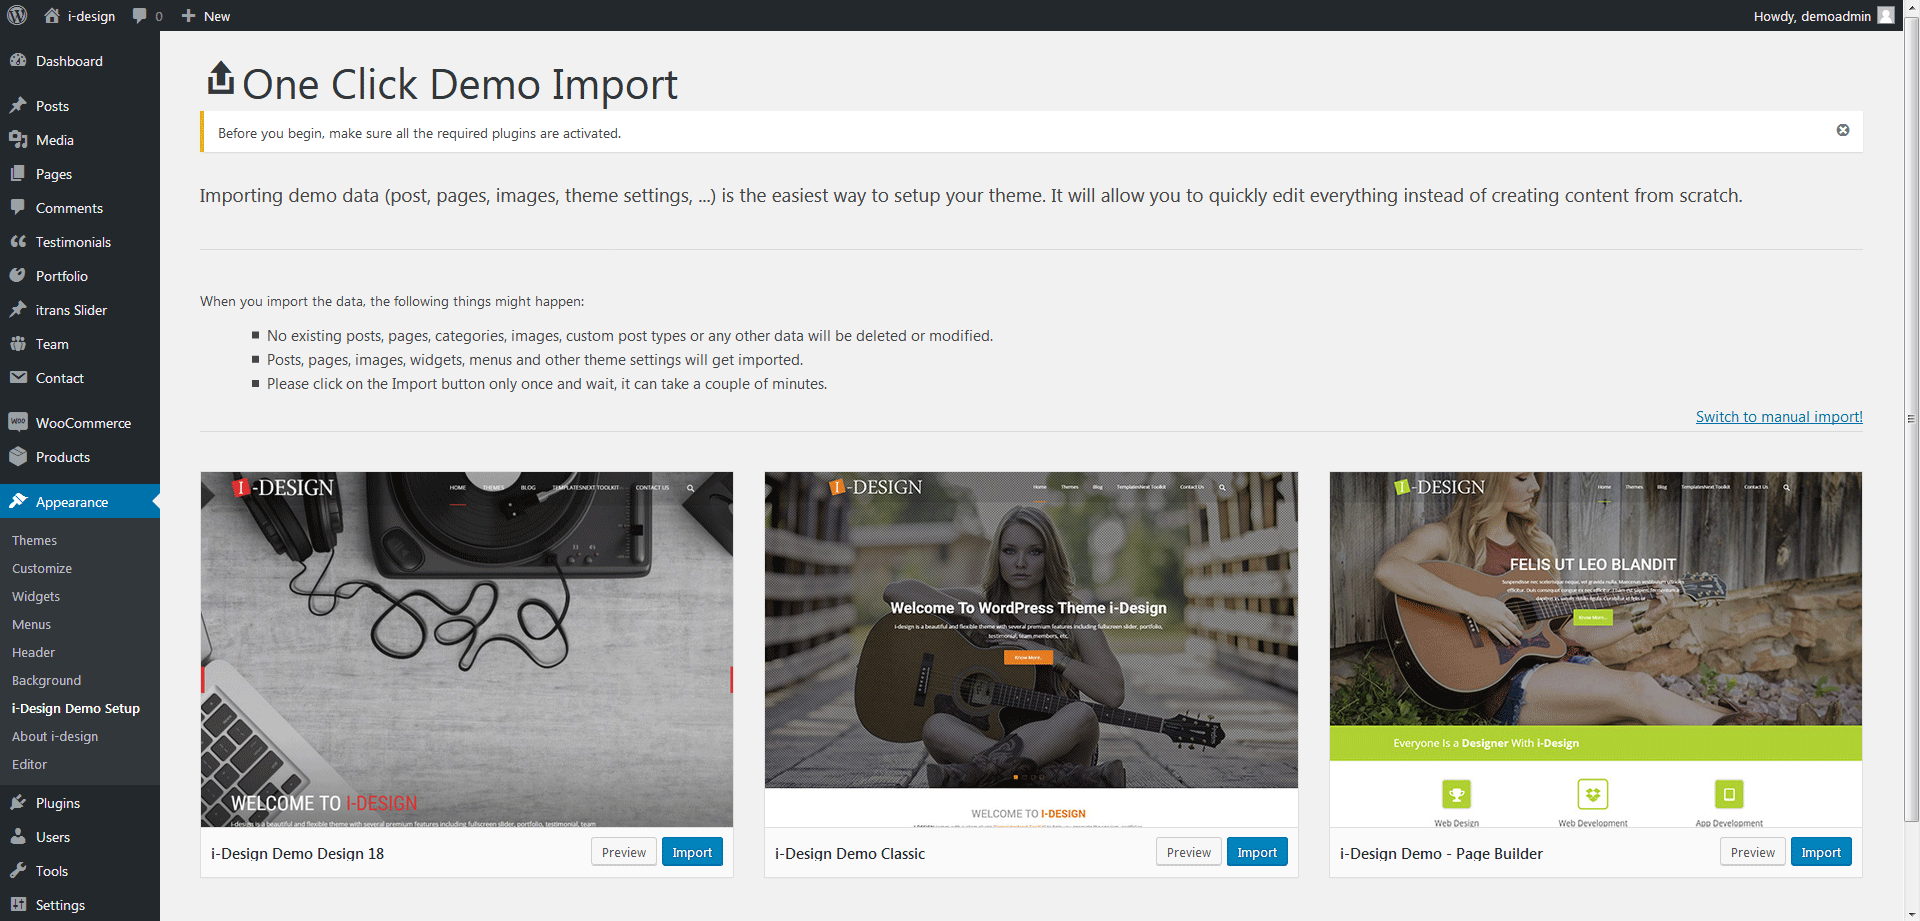
Our themes comes with feature called “one click demo setup”, where a you can set up your website in one click. The process includes
- Importing all demo contents, including posts, pages, portfolios, contact forms, etc.
- Import All media files.
- Import customizer settings and menu settings
- Setting up front page
- Import Slider Revolution sliders with media (only in premium theme I-SPIRIT)
To start the process install all recommended plugins and choose your demo from menu “Appearance” > “i-design Demo Setup”
Note: this process may take 5 to 20 minute or sometimes more depending on your server resources and network speed, for more details check the FAQs here.
Beside product carousels I-DESIGN gives you features like products only search, Shopping cart on navigation, wishlist, product compare, etc.
Product only search, top navigation cart and top navigation login menu item can be activated from menu “Appearance” > “Customize” > “WooCommerce Theme Options”
To activate/deactivate wishlist or product compare go to menu
“WooCommerce” > “Settings” > “TX Wishlist” And “WooCommerce” > “Settings” > “TX Compare List”
The premium version ( I-SPIRIT ) comes with several other premium features like, Front end Login, Ajax Search, etc
Few Useful Shortcodes
Random Sale Items
[products limit="4" columns="4" orderby="popularity" on_sale="true" ]
Featured Products
[products limit="4" columns="2" visibility="featured" ]
Best Selling Products
[products limit="3" columns="3" best_selling="true" ]
[best_selling_products per_page="12" columns="4"]
Newest Products
[products limit="4" columns="4" orderby="id" order="DESC"]
Specific Categories
[products limit="8" columns="4" category="hoodies"]
Show Top Level Categories Only
[product_categories number="0" parent="0"]
Show Only Products With tag “hoodie”
[products tag="hoodie"]
Recent Products
[recent_products per_page="12" columns="4"]
Featured Products
[featured_products per_page="12" columns="4"]
Products By ID
[product id="99"]
[products ids="1, 2, 3, 4, 5" columns="4"]
Top Rated Products
[top_rated_products per_page="12" columns="4"]
I-DESIGN lets you choose you fonts from google fonts library. Users can set their “Heading” and “Content” font style separately. To change the font styles go to menu “Appearance” > “Customize” > “Typography”
The responsive menu for mobile devices can be configured different ways, Slide from left, top or right, colors, break points, etc.Controls area available at “Appearance” > “Customize” > “Responsive Menu”
I-DESIGN has a flexible footer widget area( Main Widgets Area).
If it contains only one widgets it will have a single column with 100% width widget. It can have upto four columns depending upon number of widgets, if more than 4 widgets placed, the widgets are automatically arranged within these 4 columns based on their content.
Copyright and Credit Links
I-DESIGN users are free to change the copyright info and credit links way they want them. We suggest them to use a child theme to change them so that the changes they make remains after theme update.
The premium version of the theme (I-SPIRIT) has the options to edit the copyright and credit text via admin panel
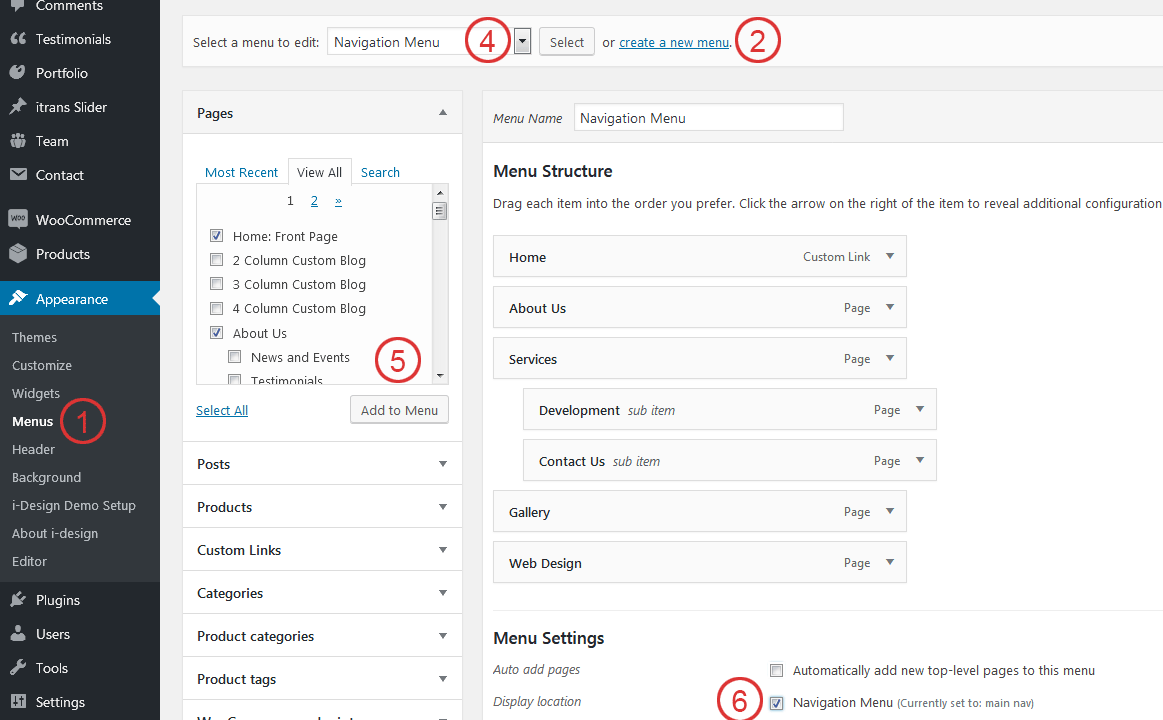
To setup your menu,
- Go to menu “Appearance” > “Menus”
- Click on “Create a new menu”.
- Enter your menu name, for example “Navigation Menu” and press “Create Menu” button.
- Now select your menu from the drop down menu if it is already not selected.
- Select the pages from left and press button “Add to Menu”
- Check “Display location : Navigation Menu”.
- Press on button “Save Menu”