If you are an artist or a photographer or a freelancer and want to showcase your work online, this step by step guide will help you start your portfolio website using WordPress and Elementor Page Builder along with one of our Free theme i-design.
Install Your WordPress
Your first step would be to install WordPress. I would assume you already have installed WordPress, if not there are two ways to install WordPress,
- Manually uploading WordPress installer, adding MySQL database and editing w-pconfig.php
- Using cpanel application to install WordPress. Most of the hosting companies have an application installer in cpanel they provide you.
Most of the hosting companies these days will give you unlimited space but they keep a cap on file size. To check the maximum file size upload limit, you can go to WordPress dashboard menu “Media” > “Add New” find out the string at the bottom left of the page that says “Maximum upload file size”. Make sure you have at least 10MB upload limit, otherwise you won’t be able to upload large images.
Installing Theme Theme
We will be using Free WordPress theme I-DESIGN to create the portfolio website. I-DESIGN comes with inbuilt portfolio post type along with tools to create a gallery of images to create proper portfolio website unlike other themes only letting you create a portfolio gallery without linking them to a detailed portfolio item.
STEP 1. Go to Menu “Appearance” > “Themes”.
STEP 2. Click on “Add New” button and search “i-design”.
STEP 3. Install and activate.
Installing Plugins
STEP 1. Go to menu “Plugins” > “Add New”.
STEP 2. Search accompanying plugin “Templatesnext Toolkit”.
STEP 3. Install and activate.
Repeat the above process and install and activate plugin “Elementor”.
Setting Up The Theme
Go to menu “Appearance” > “Customize”, This panel is called live customizer panel or just customizer panel. Most of the theme and site settings are accessible from here.
Uploading Logo
If you have a logo, go to “Site Identity” and upload your logo and publish.
Reverse Transparent Logo
If you have a transparent logo for dark background, upload and publish. If you do not have one, the default logo will be used on transparent header.
Site Title And Tagline
In customizer section “Site Identity” and Add/Edit your site title and slogan.
Site Icon
Site Icon is the small icon that appears on browser tab along with site title. A rectangular small image is used as site icon.. Upload your Site Icon from customizer section “Site Identity”.
Theme Color
Select your theme “Primary Color” from customizer section “Colors”.
Social Media Links
Go to customizer section “Social Links” and add/edit/remove your social media links
Email And Phone Number
Go to section “Basic Section” and add/edit your phone and email.
Optional Site Search And Preloader
Optionally you can hide and show site search and page preloader.
You can also change your site Fonts from section “Typography”.
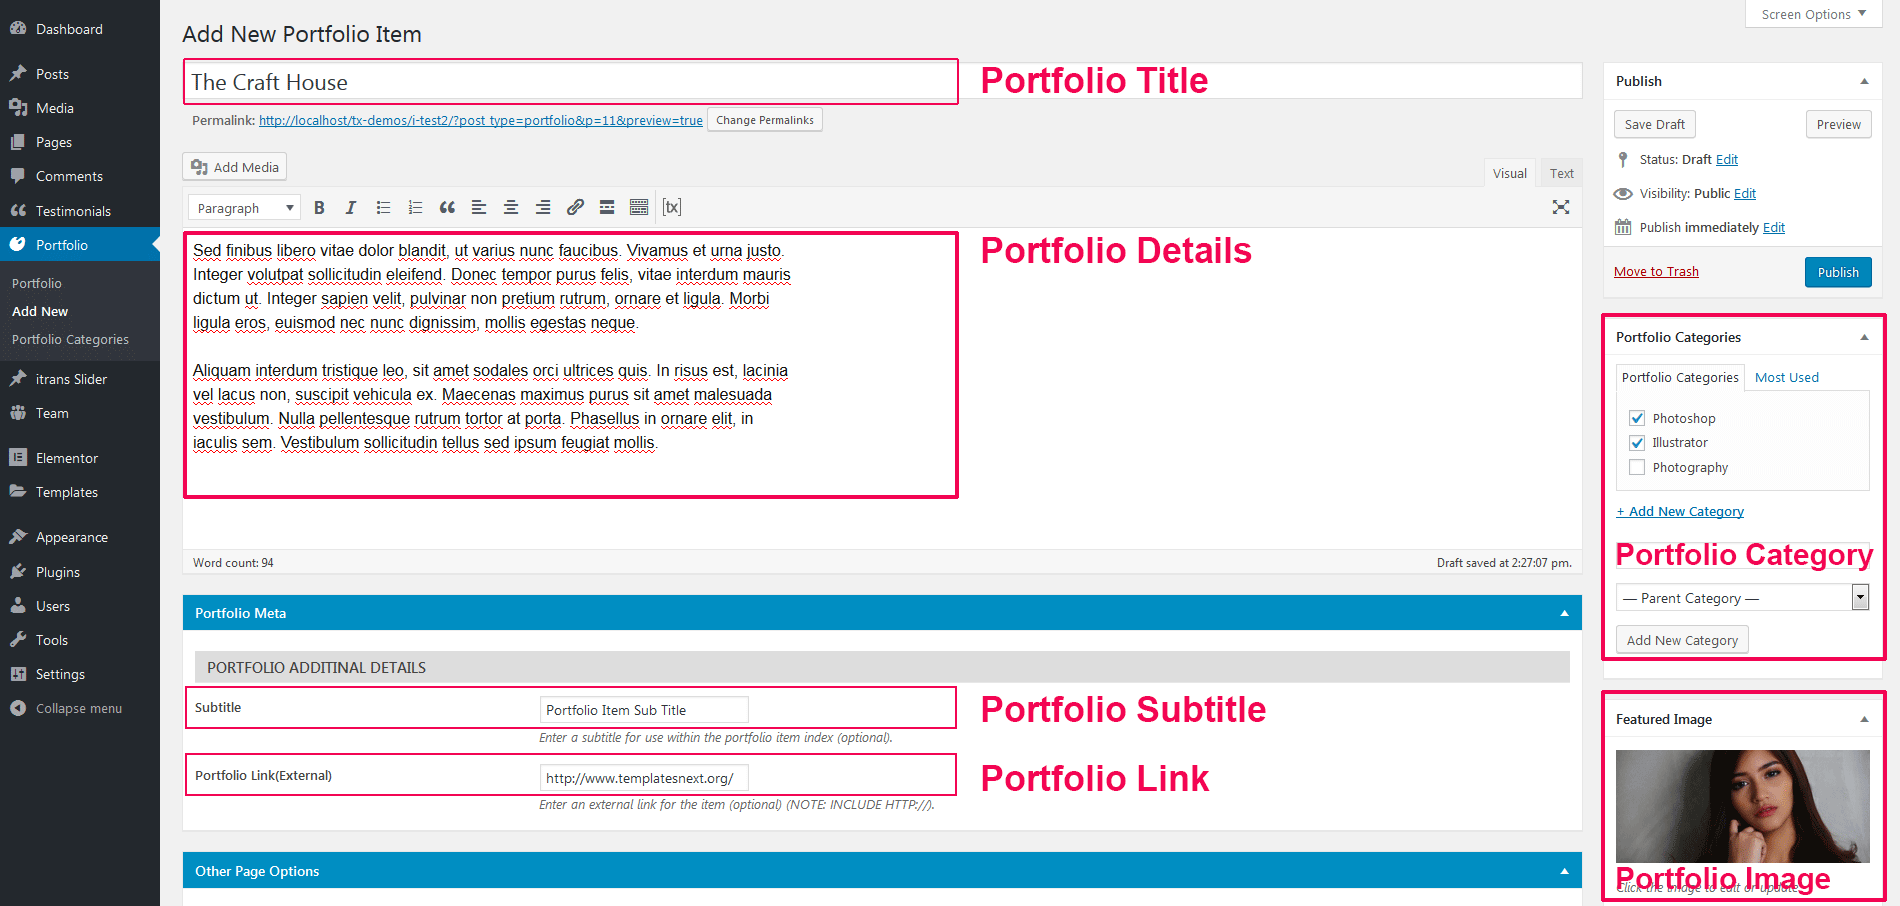
Creating The Portfolio Items
Go to menu “Portfolio” > “Add New” and add
Title : Title of the portfolio item.
Content : A little detail about the portfolio item.
Subtitle : Optional subtitle for the portfolio item, leave blank if you do not have one.
Portfolio Link : Link to your client website or any other. Leave this field blank if you do not have one.
Portfolio Category : Add a portfolio category, example; portrait or illustrator.
Featured image : Upload portfolio image, you can upload upto 3 images, if more than 3 images used a slider will appear instead of single image in the portfolio item page. Recommended image size is standard HD image (1920×1080).
Publish and add more portfolio items.
Premium theme I-SPIRIT has options to add more images along with videos.
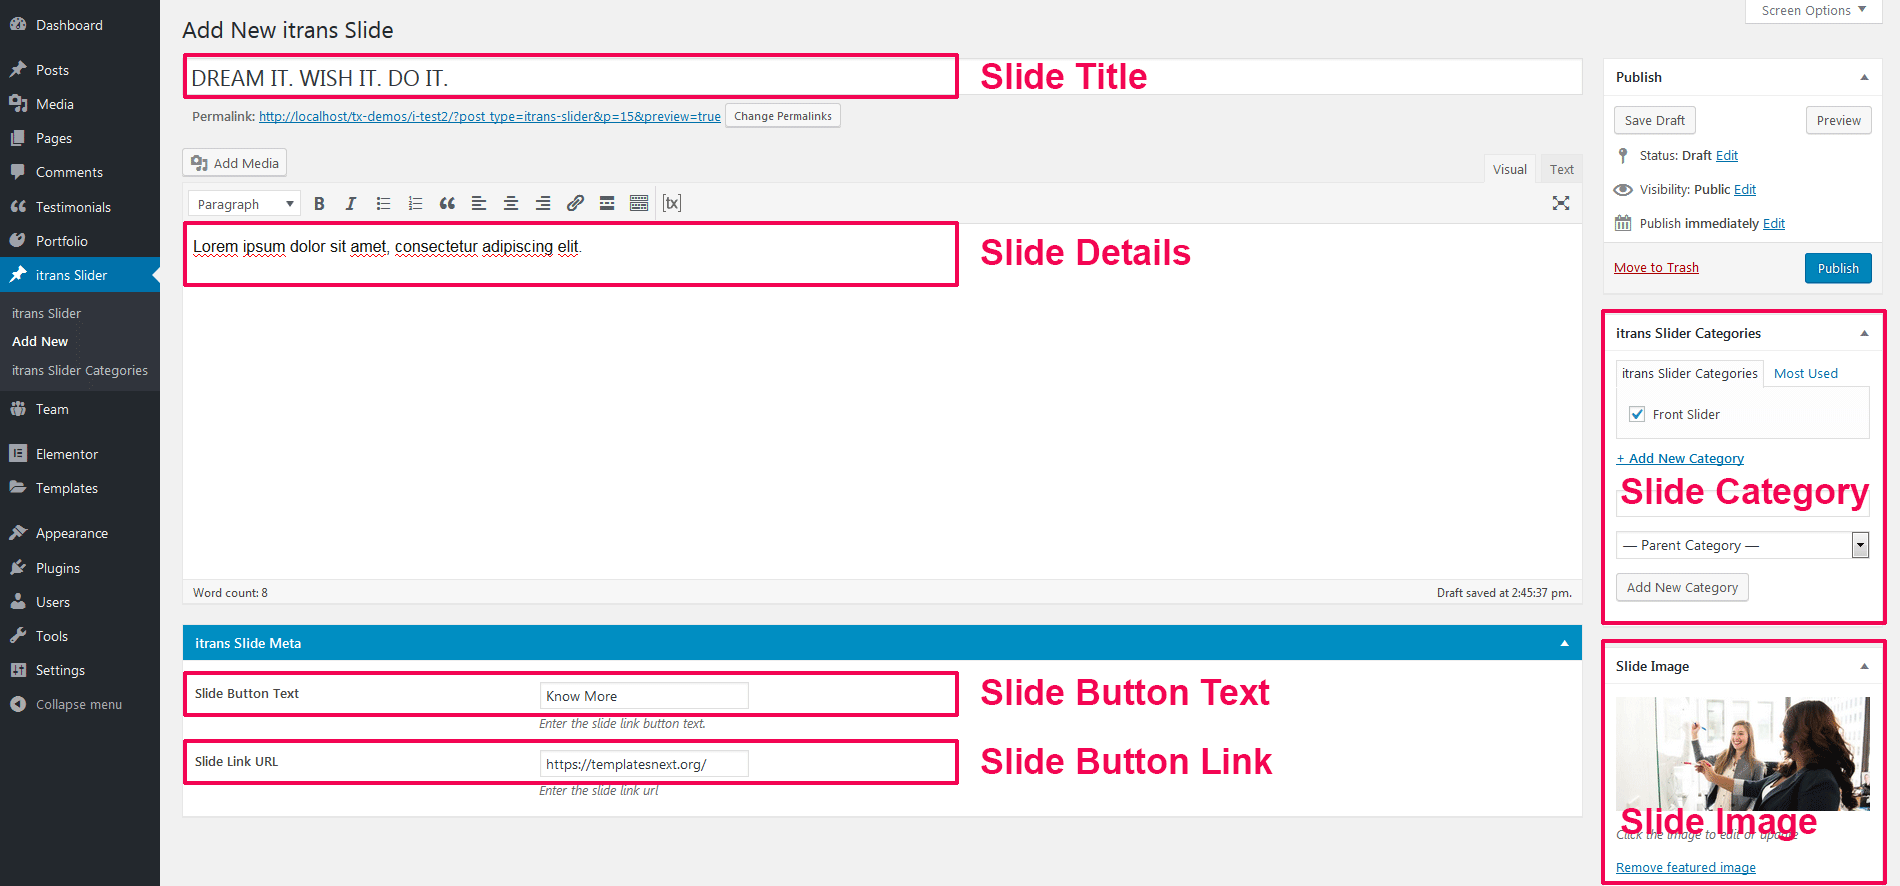
Adding Slides For Home Page Slider
This is an optional step, I-DESIGN comes with its own inbuilt slider but we will use more advanced itrans slider with no limitation on number of slides.
Go to menu “itrans Slider” > “Add New” and fill in the fields
Title : Slide title.
Content : A little details on the slides (optional).
Slide Button Text : Text on slide button (optional).
Slide Link URL : Slide button link {optional}.
Category : Optional, you can use the category to create multiple sliders based on category.
Slide Image : Upload slide image. Full HD image recommended (1920×1080)
Save slide and repeat the process for more slides.
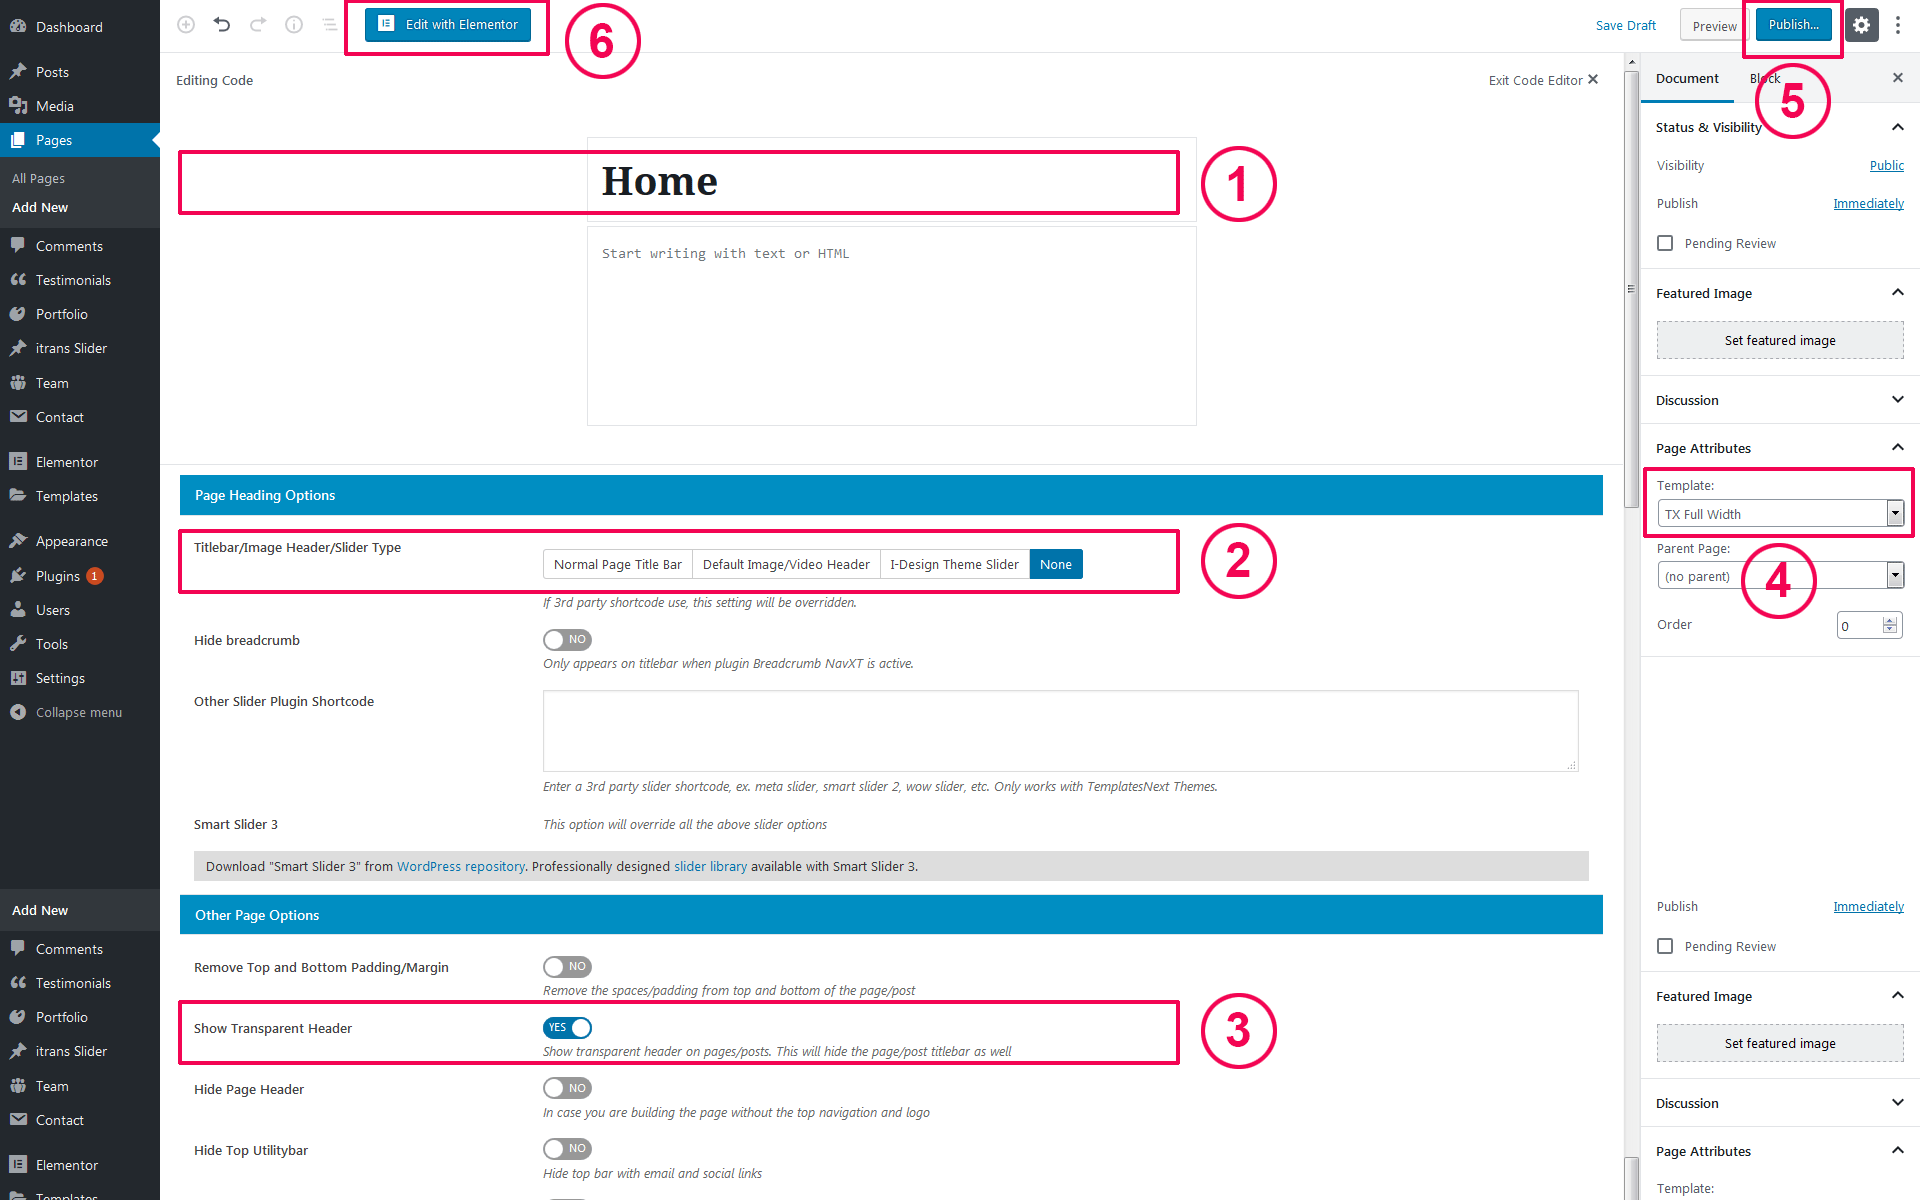
Creating The Home Page
Go to menu “Pages” > “Add New”.
STEP 1. Add page tile example: Home.
STEP 2. Select “None” for “Titlebar/Image Header/Slider Type”.
For theme I-MAX, I-EXCEL, I-CRAFT and premium theme I-SPIRIT choose “Hide Title Bar”, “Yes”.
STEP 3. Select “YES” for “Transparent Header”.
STEP 4. Select template “TX Full Width”.
STEP 5. Press on button “Publish”.
STEP 6. Once page is saved press button “Edit With Elementor”.
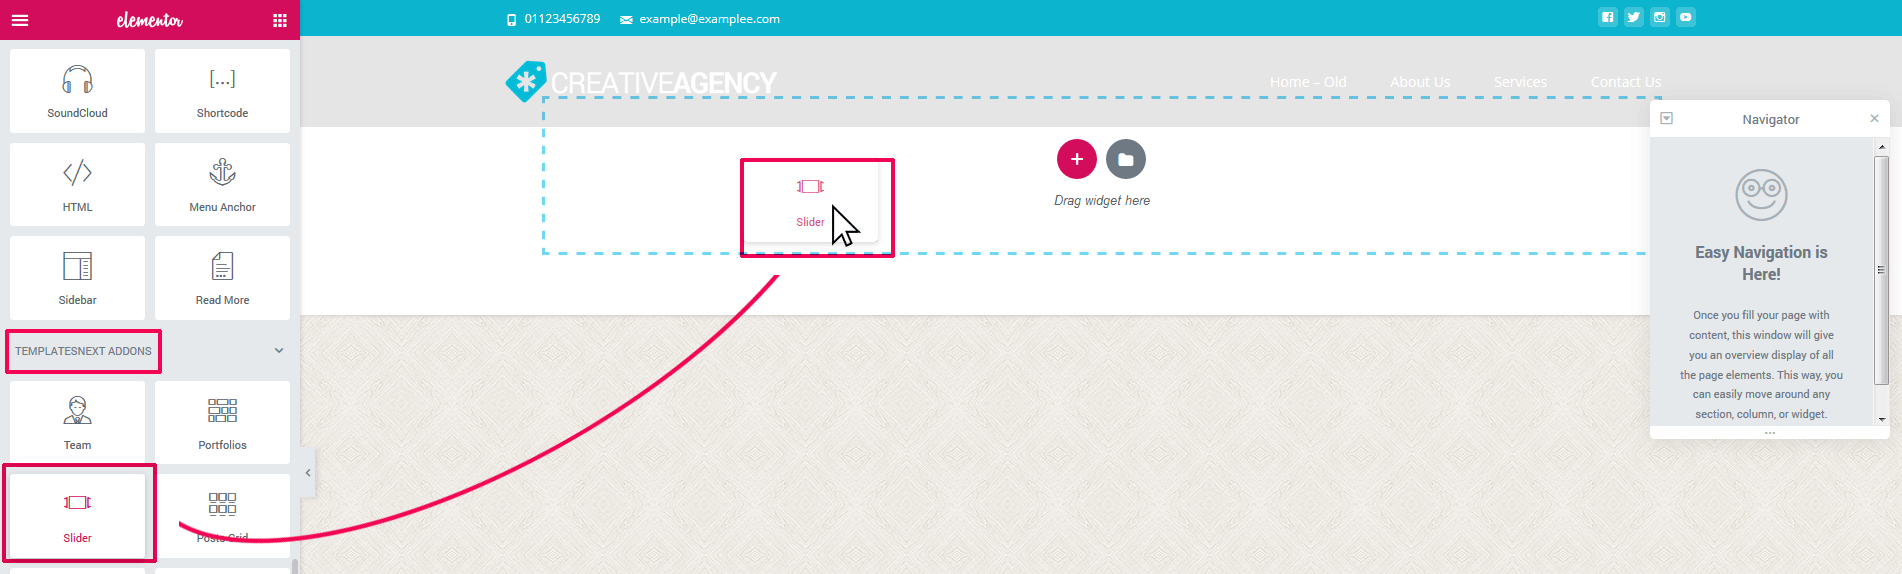
Design The Portfolio Home Page With Elementor
Inserting itrans Slider
We have added our portfolio and slides for the slider, Now let’s start with the process of designing the home page. It becomes extremely easy designing home page with elementor and our themes.
STEP 1. Drag and drop the “Slider” from “TemplatesNext Addons” block.
STEP 2. Select “Section” in “Navigation” panel and make it “Full Width”.
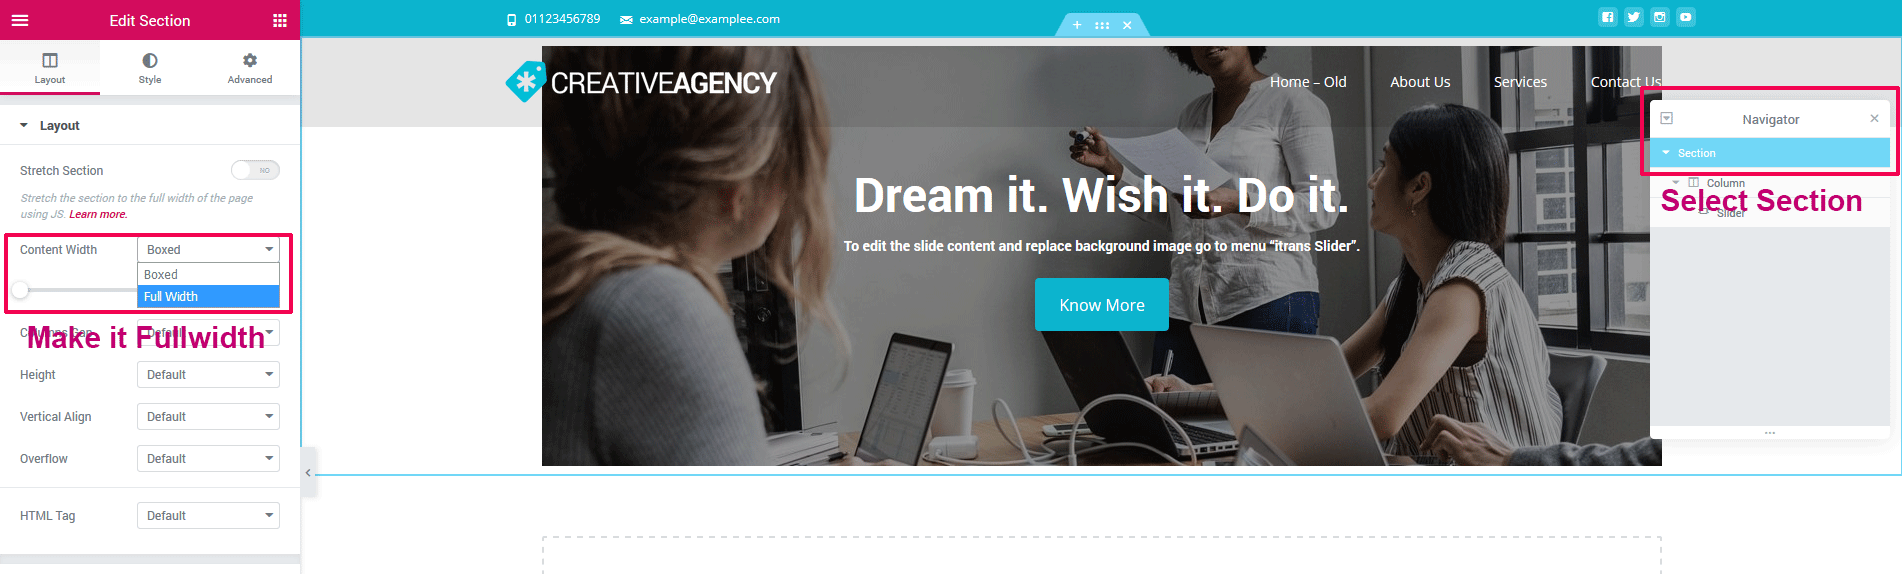
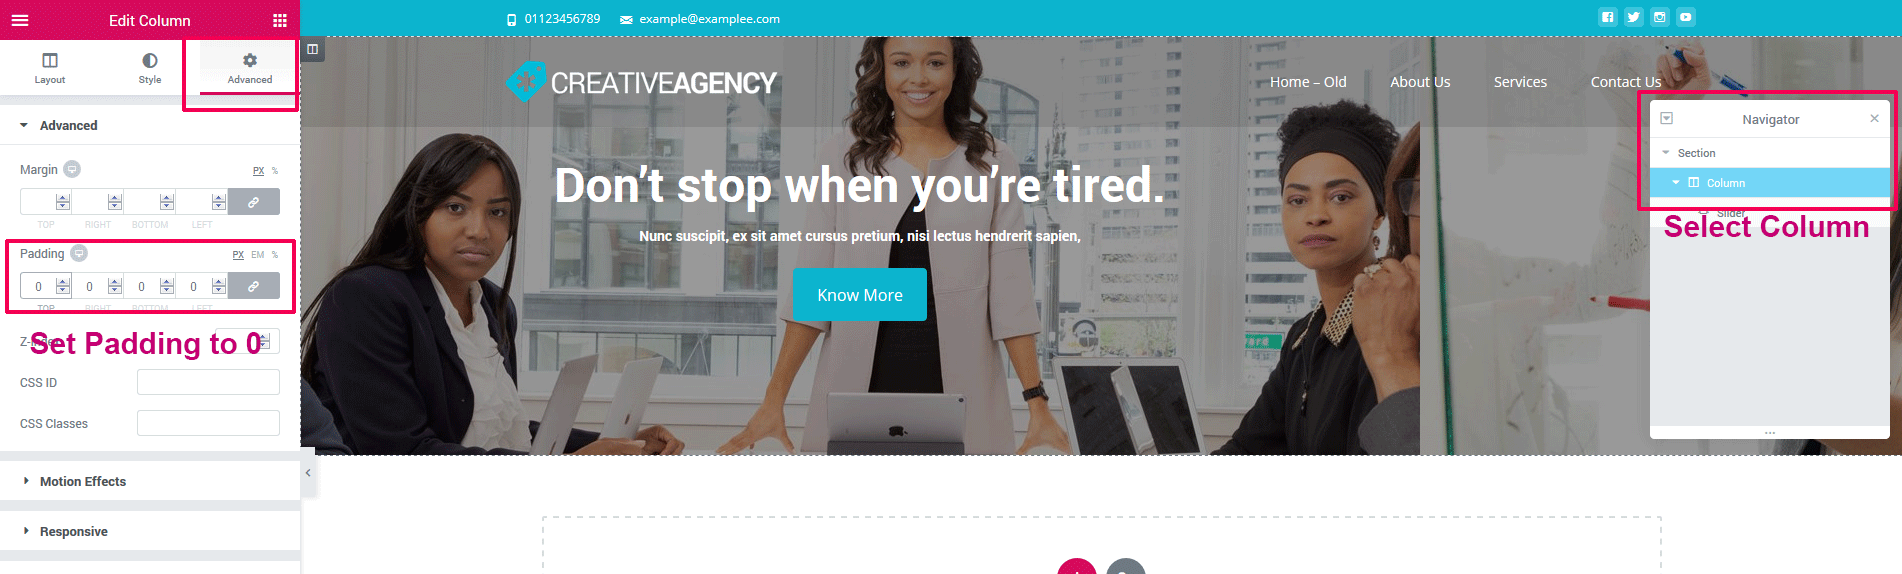
STEP 3. Select “Column” and set padding to 0 in “Advanced” tab.
Save and refresh so that the slider reloads with proper width.
STEP 4. Adjust the slider settings as required. My settings were
Slider Height : 640.
Slider Image Overlay : Custom Overlay.
Background Type : Gradient.
Color: rgba(24,150,175,0.73).
Second Color : rgba(204,38,201,0.69)
![]()
Adding A Shape Divider (Optional) Below The Slider
Shape dividers are design element to bring flow between section. This is optional, use one if you like.
STEP 1. Select the slider section from “Navigation” panel.
STEP 2. Go to tab “Style” > “Shape Divider” and set the values like
Bottom
Width : 135
Height: 120
Bring to front : Yes.
![]()
Adding An Intro Section (Optional)
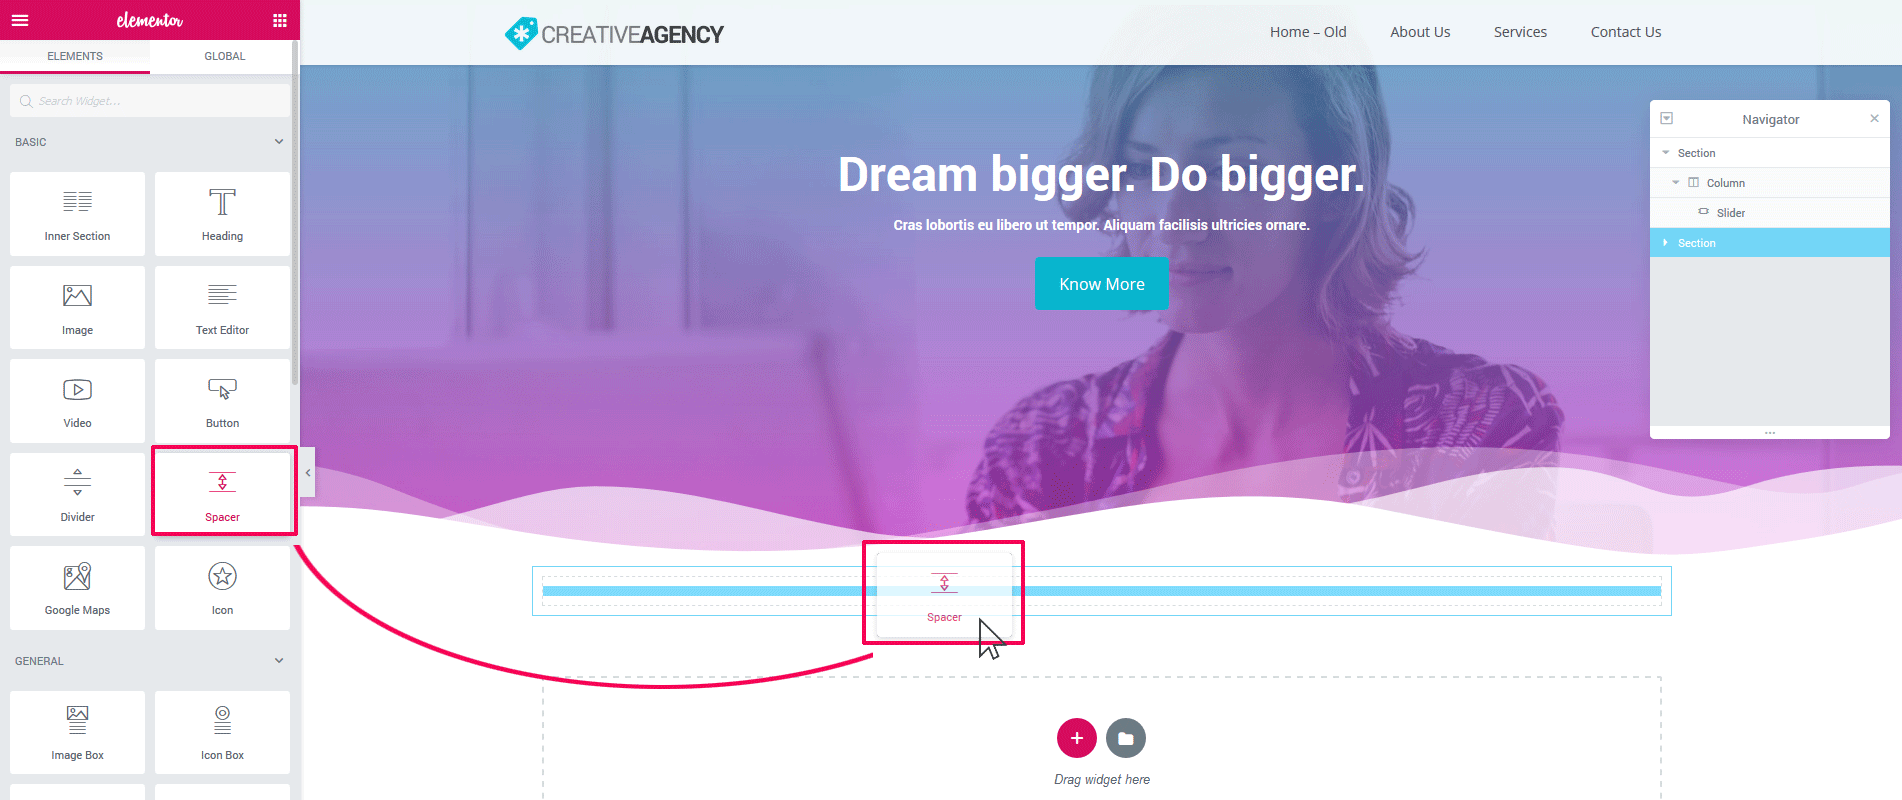
STEP 1, Insert a row pressing the plus button, and drag the separator block in it and set a height according to your liking.
STEP 2. Insert a row with 2 columns.
STEP 3. Add heading and text editor in the left column and image in the right column.
STEP 4. Set the typography and colors according to your liking.
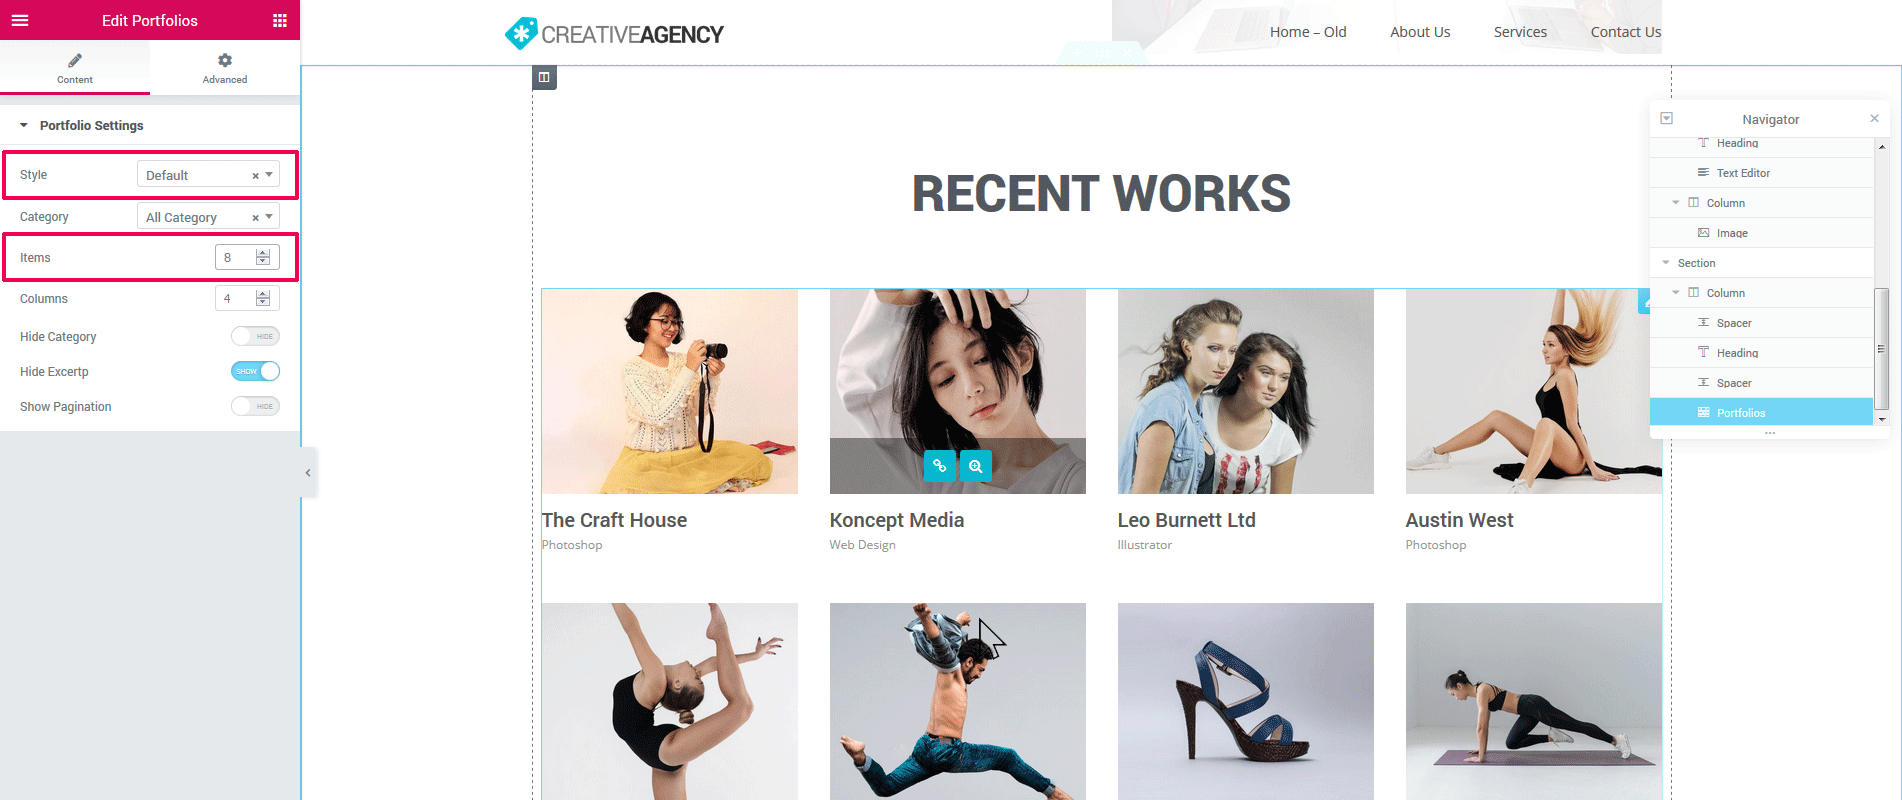
Adding The Portfolio Section
STEP 1. Add a new raw pressing the plus button.
STEP 2. Drag the separator block from left panel and set a height to create a gap.
STEP 3. Drag and drop the heading block and change the text along with color and typography.
STEP 4. Drag and drop the “Portfolio” block from “TemplatesNext Addon” section.
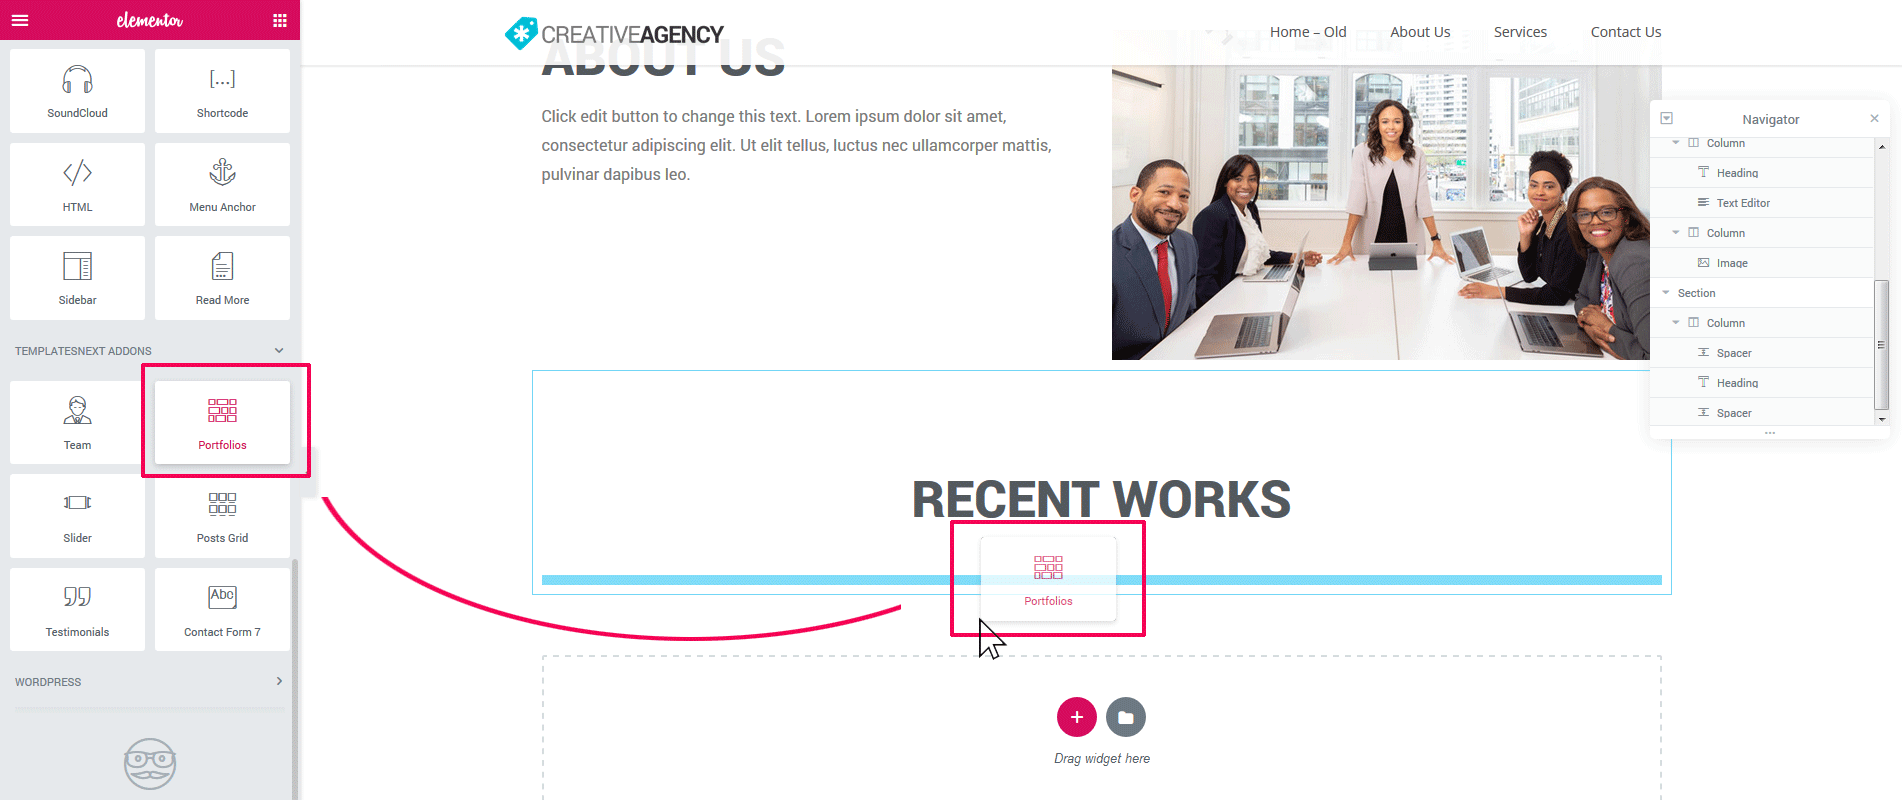
STEP 5. Set your portfolio options on the left panel, like style, number of items, etc.
Set Newly Created Page As Your Homepage
Go to dashboard menu “Settings” > “Reading”
Select “A Static Page” in “Your Home Page Displays”
Now select the newly created page as your home page and press on button “Save Changes”
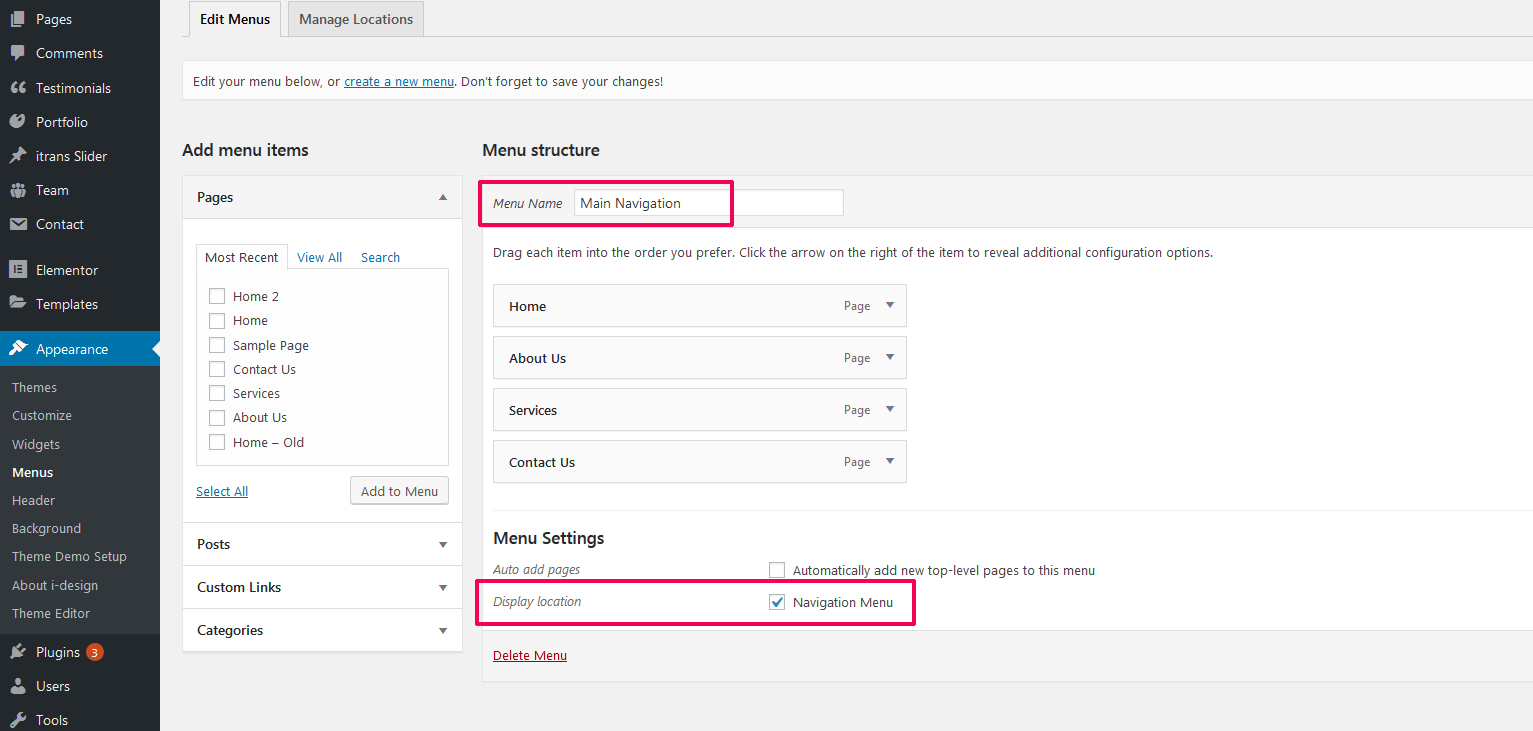
Set Top Navigation Menu
STEP 1. Go to dashboard menu “Appearance” > “Menus”
STEP 2. Create a menu example ; “Main Navigation”.
STEP 3. Drag and drop pages to to create your menu.
STEP 4. Check “Display Location” , “Navigation Menu” and save the menu
Conclusion
If you wish, you can add Team member and Testimonials carousel following the same steps. The premium versions of the theme I-SPIRIT comes with much better design with multiple portfolio item templates.
We will provide the complete layout as “One Click Demo Import” to all our themes, so that you can import the layout. All our theme has support for plugin “Contact Form 7”. Once you install and create contact forms, you can drag and drop that contact form using our contact form element for Elementor. We will publish tutorials on contact forms in future. If you have any doubt or questions, use the contact form to let us know.